Autorentic Income & Expenses is our latest initiative, added free for all property managers.
This feature allows you to record expenses for each individual property, including maintenance, management fees, utilities, staff costs, and other property-related expenses, alongside your rental income.
With this, you can better understand each property’s real performance, track expenses over time, and calculate more accurate rental yield, not just the rent collected.
Built based on feedback from property managers, this is one of the highly requested features we listened to and made available in Autorentic.
Approach 1: Recording Monthly Income & Expenses
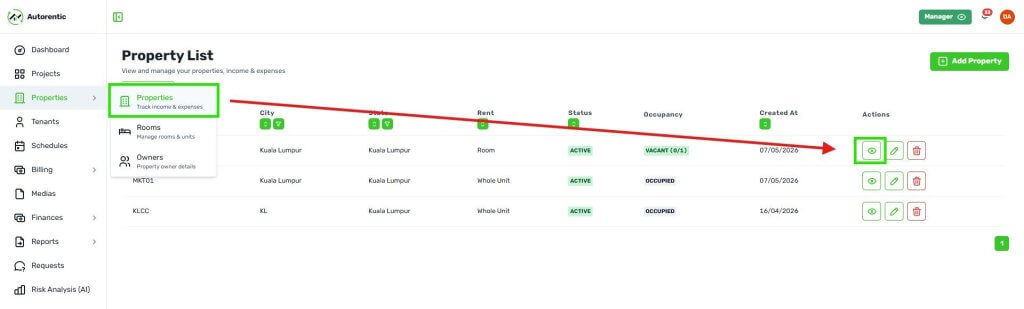
Step 1: Switched to "Manager" view and navigate to 'Properties' tab.
Make sure you have switched to “Manager” view (top right side of your dashboard).
At the manager’s dashboard click on the ‘Properties‘ tab on the left side menu bar.
You will see the list of your properties set within Autorentic.
Look for the property you wish to manage and then click the eye icon (👁) button under actions column to view the property details (see image below).
Step 2: Property Overview and navigating to Manage Income & Expenses
You will see the overview of a specific property. It contains details like:
Property code,
Property address,
Vacancy status,
Property status (active/inactive),
Monthly rental (amount),
Rental types,
Property owner,
Purchase price,
Market value and;
Property performance.
Next, select ‘Manage Income and Expenses‘ to start adding information onto your property.
Step 3: Overview of Income & Expenses Dashboard
At the manage Income & Expenses screen, you will see three main categories:
Other Income,
Property Expenses and;
Salary.
Default view is monthly view (see image below). Please ensure you are at the month that you want.
Select the category you want. The selected tab will be expanded and then click “+ Add” button to begin adding information for the respective month.
Important notes:
Rental Income: The rental income information are automatically pulled from the rental invoice. So you don’t have to enter the rental income manually.
Other Income: You can record any other income associated to the property, such as forfeited deposits, commission received, or any other earnings that are not part of the regular monthly rental.
Property Expenses: You can record any expenses incurred or costs associated to the property such as maintenance and repair costs, utility bills, insurance premiums, management fees, and other related expenditures.
Salary: You can record salary payments to your employees assigned to manage the property, including their basic monthly salary, EPF contributions, SOCSO and EIS contributions, and any applicable zakat payments.
You don’t have to add any information if they are not relevant to the property.
Approach 2: Managing Income & Expenses by Year
Step 1: Accessing Income & Expenses Dashboard.
Make sure you have switched to “Manager” view (top right side of your dashboard).
At the manager’s dashboard click on the ‘Properties‘ tab on the left side menu bar.
You will see the list of your properties set within Autorentic.
Look for the property you wish to manage and then click the eye icon (👁) button under actions column to view the property details.
Select the “Manage Income & Expenses” button and you will land at the screen below (see image below).
Step 2: Overview Expenses In Year View
At Income & Expenses dashboard.
There are 2 tabs, Monthly & Annual. Select the “Annual” button to switch to the annual view.
You will now see a table displaying full 12 months of the year across every income and expense categories.
Make sure you are at the year that you want (refer to the image below, it is located near your profile).
Step 3: Inserting monthly income & expenses through annual view
To edit an entry, you can click on the cell of the month you wish to update and type in the new amount, and click elsewhere or press “Enter” to save the change automatically.
Setting Up Recurring Entries
Step 1: To get started, follow Method 1, Steps 1 to 3 to navigate to the Manage Income & Expenses page.
Look for the recurring icon (a looping arrow symbol) located at the top of the page and click on it.
Step 2: The settings panel will slide open from the right side of the screen.
Step 3: In the settings panel, locate the income or expense category you wish to set as recurring.
Set how often the entries should repeat (e.g., Monthly, Quarterly, Yearly) and the amount as well.
Step 4: Once done, click the "Save" button at the bottom of the panel to confirm your settings.
These amount will be continuously added each month on the assumption it is the same. However, you can update the amount anytime you want.
Have more questions? Please do not hesitate to contact us.